- 3D Printer Model: Ender ^
- Slicer: Creality ver 1.0.4.9
- Hardware Setup:
- Problem description: Installed B L Touch to my Ender 6 and firmware for it and then the platform locked in the Z axis at approx 60mm below the nozzle with the read out on the screen x=260 y=260 z=0 and I cannot use the z axis up as it will only go down and on the way up stops at 0 which is again 60mm below Nozzle
- What I tried: Disconnecting BL Touch and reconnecting Z stop and flashing ender 6 board and screen settings but not change. Itried adding G29 to the creality G codes and reconnecting B L Touch and disconnecting Z Limit switch … Please help
Have you performed an EEPROM reset after flashing the firmware?
not sure how to do this got a lot to learn can you give me some instructions
You need to connect to the printer, and run the following commands:
The first command will reset the EEPROM, then M500 will save the changes.
Yea I have a micro usb cord connected but with looking into it further I need to get a data transfer one as the one I have just powers up the printer will purchase tomorrow. How do i reconnect to you tomorrow
Thanks so much for your help
Thanks again I will be in touch
You can also create a text file, add those commands in it, rename it to .gcode and then “print” it from the machine. It will do the same thing.
Then, reboot and try to set the Z offset again.
Ok will try will see how I go
Hi,
I tried to install BLTouch (not genuine, but from Trianglelab) just yesterday night and had a similar (if not the same) issue. Once a BLTouch enabled firmware (I tried Creality firmware from Creality as well as from TinyMachines) was flashed, the printer refused to move the Z axis up.
Not sure about details of the BLTouch “signals”, but my theory was that the sensor was permanently giving the mainboard a signal that printbed is touching the sensor and thus the mainboard/firmware was refusing to move the printbed upwards (moving it down worked!).
Trying to locate the problem I traced the wiring from the BLTouch to the mainboard. Doing this, I realised 2 things:
- The sensor is specified for 5V and it’s getting 3,3V from the mainboard
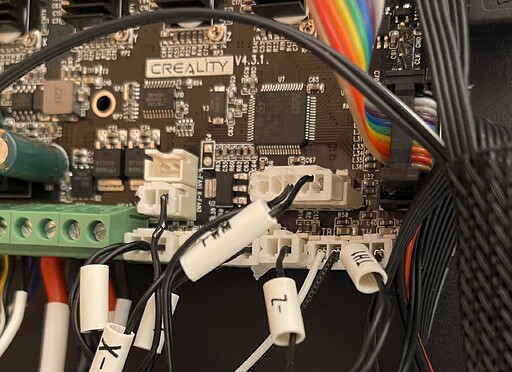
- The wiring on the mainboard is some kind of “crossover” way utilizing 2 pins of the 5 pin connector and one of the Z-axis endstop connector. Unfortunately I don’t have a better picture of it than this one:
[sorry, I’m not able to embed an image here]
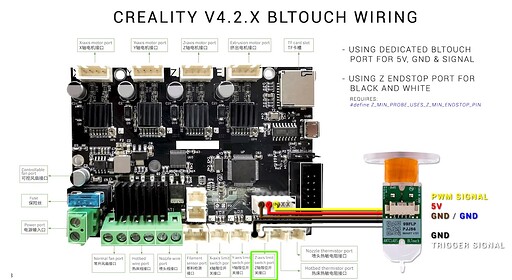
The wiring seams to be similar like in this reverence I found, but it’s not using the 5V pin and none of the GND pins of the 5-pin connector:
[sorry, I’m not able to embed an image here]
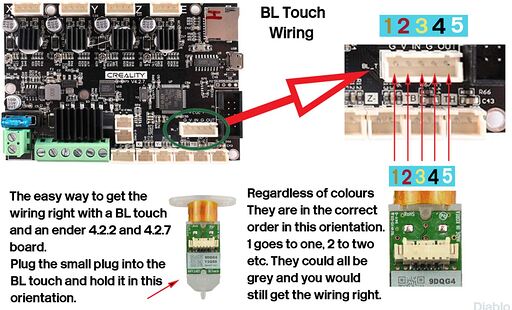
As a quick test I hooked up the sensor (not mounted to the printhead anyore) “straight forward” like in this diagram:
[sorry, I’m not able to embed an image here]
…and ta-daaaa, this seamed to work! I still hat the printer lying on the side, but now the Z-axis was moving towards the printhead again (while homing, for example) until I manually touched the BLTouch sensor. As it was already late at night, I left it like that. My plan is to wire up the sensor “straight forward”, by completely bypassing the Ender’s wiring harness and breakout-board.
I guess the 3,3V instead of 5V is the core problem here, but I’m not 100% sure. Any thoughts on this?
Best,
Rixi
You should try attaching the pictures to your post. There are no limitations, other than size.
Maybe I’m blind, but nope, I don’t see an option to attach any pictures/files.
Hi again
I have purchased the data cable and have it connected to the printer where do I run the M502 and M500 commands.
You need to use Pronterface or a similar program.
But please take your time to read more about this, before starting to mod your printer.
Ok thanks here goes I guess
It took me a while since I was on holiday and then tied to bed for a week. Now I finally wired up the BLTouch and it flashed the firmware (Tiny Machines) accordingly.
And now it works! My first printer and first time seeing a BLTouch (live) in action. ![]()
I then re-leveled the bed, of course ran through the BLTouch calibration routine and tried to dial in the Z-offset. And this turned out to become an unexpected challenge: In firmware’s leveling menu I can only set the Z-offset in 0.1mm steps which is not acurate enough.
However, during printing I can adjust the Z with 0.02mm baby-steps, but these won’t be saved in the firmware/EEPROM. I considered adjusting it manually with the bed leveling screws, but this doesn’t seems be a very smart way.
Any suggestions, how to calibrate the Z-offset via firmware/software?
@Leffty is your BLTouch running now? Have you ever measured the voltage it gots from the printer?
I don’t know how the TinyMachines firmware is set up, but you could just note the baby steps value, then change the Z offset using something like Pronterface.
For some reason I did not notice your answer yet.
Sounds like a good solution!
I‘ll give it a try in the next days and report back if I was successful and which Marlin commands I (figure out for this task and) used.


