I followed the excellent guide as inspiration for installing the BMG Wind on the X1.
The bracket was printed in PETG at 230C on my Prusa Mini; I went with PETG for better thermal characteristics (softening around 80-85C). I put something like ~7 perimeters with 35% infill to make it strong; in fact, the lip that holds the extruder is basically solid. No further treatment was applied.
Sequence of Events
- Installed BMG Wind (and used a new nozzle and heatbrake) - I put threadlocker where I could, and the BMG Wind and Heatbrake has CPU Thermal compound to increase heat transfer)
- Compiled the Digant Firmware with bit switch
- Redid all Bed Calibration
- Redid e-Steps for the new Extruder
- Redid PID for new Extruder Setup
- Redid Calibration Cubes using PLA to set Flow properly (I print at 200C nozzle and 60C bed typically)
Everything looked great at this point, but I wanted to switch to PETG since it has virtually no PM10 and PM2.5 particulate
- Found Nozzle Offset for Bed Level on powder coated rough PEI surface
- Redid Calbration Cube using PETG to set Flow Properly (230C Nozzle and 85C bed)
- Did a Single Test Print (a 30mm tall DND Mini for a friend who has asked)
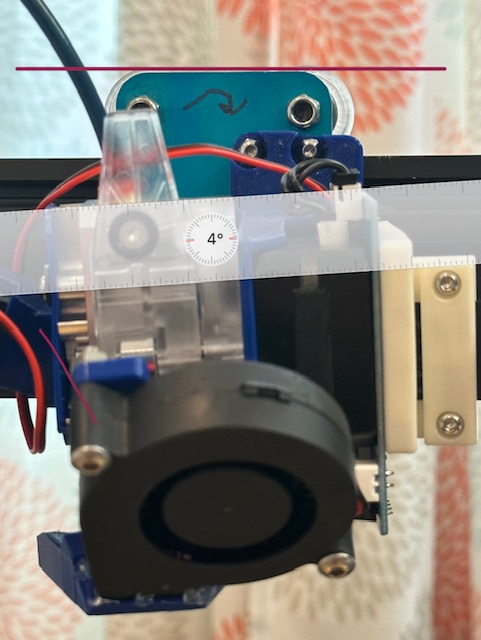
Here was my problem; I came back in the morning to start my functional print, and within 10 min found that the Nozzle crashed into the Bed and was dragging- the Filament was barely extruding. I cut power, and instantly saw the extruder didn’t seem level anymore…I took it apart and found the following
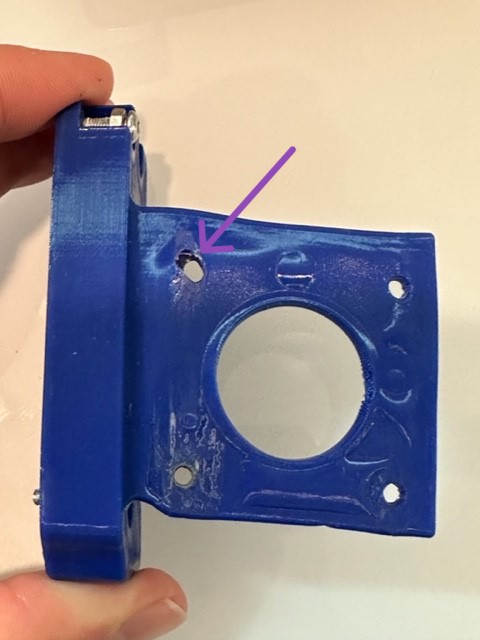
- the PETG Extruder bracket has drooped about 4deg C
- A Hole with the screw was deformed significantly
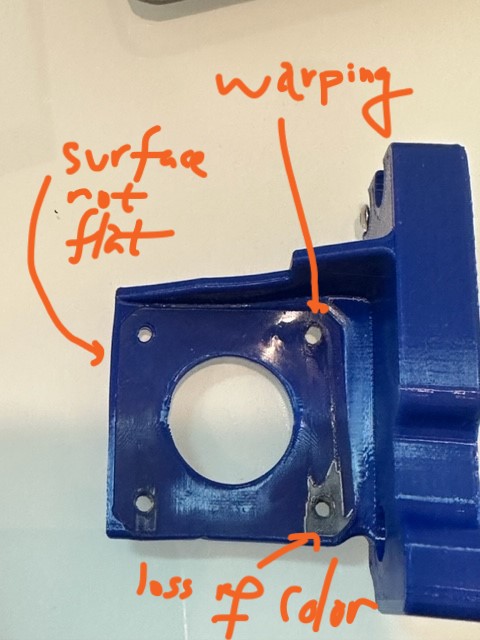
- the entire surface of the bracket looked warp
- Several ‘straight’ edges were curved now
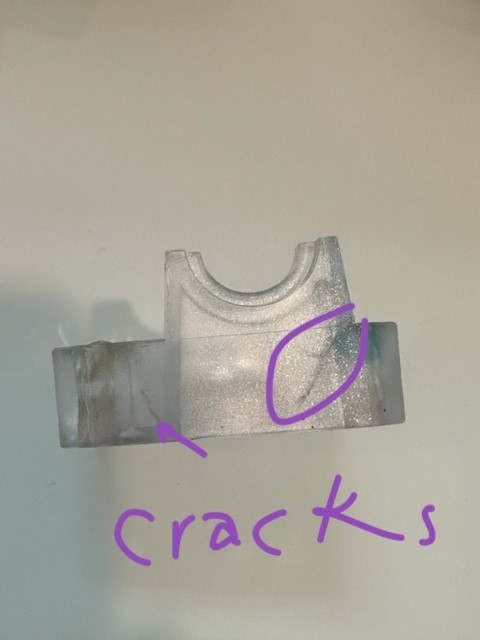
- the BMG Wind cracked in several places
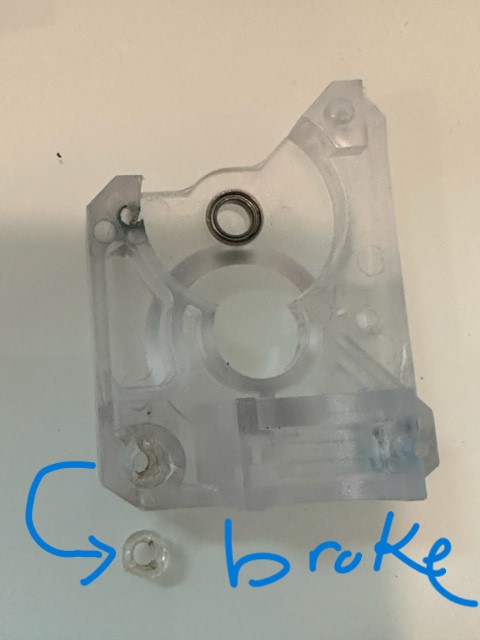
- the BMG Wind had a bracket that broke off
Any thought on what is wrong in my set up?
As a new user, I can only upload 1 photo, which doesn’t do this justice. I can’t even do imgur links, but add the HTTP yourself, and see below for the most impactful 1 photo.
imgur DOT com SLASH a SLASH yhKIozy
I wonder if the screws were “too tight”, but I did them tight enough to feel secure. Any less would not have made sense to me.
Finally, I did some minor modifications, that I believe have not interfered with the Thermal Failure, but will list for completeness:
- Custom Shroud for Fan on Heatsink - instead of the old dinky fan, I put a 5050 blower; it blows with a TON of air to keep it cool - on vs off is a huge difference. It is more weight, but to me it is weight in the right place, especially at the speed I print at. I see no connection to the failure, if anything, this would help by drawing heat away from the Body, and thus, the Bracket.
- ** 5050 Fan with Two-side Duct for the Nozzle** - many others have done this, nothing unique, but I did not do this till upgrading to the BMG Wind. I see no connection to the failure, if anything, it would improve airflow, but the air is directed down towards the print.
- Wobble Wings - They are truly amazing for eliminating Z wobble on the prints, but I did not add this till upgrading to the BMG Wind. I see no connection to the failure.
Apologies to the Admin(s) here, but I realized I could get in the images if I replied to myself 
I can see the desire to avoid it being flood with non-value added pictures with people who say “HELP” without any work on their part, but I think I don’t fall into that.
Thinking about it, two things come to mind
-
My Z Probe is slightly too low, causing stress on the part my Z Offset is about +1.5mm, which means the whole Bed deflects for the Z Probe to trigger (I still run default SX1 Z Probe). I have the nylock mod on it, and never had an issue with bed level despite all the deflection during Z-homing when running the stock metal bracket.
With PETG it is likely a different story. It may not be a big deal to the PETG when cool, but if I’m doing print after print (i.e. my ‘set up’) then the head build up of the last print never dissipates, leaving the print to be more prone to acute mechanical stress events. If anything, it means I’m definitely going over 85C on the stepper motor when printing, which is roughly the TG for as-printed PETG.
-
People are actually remelting the bracket to gain significant resistance to heat deformation * - Is 3dprintbeginner, or anyone else quietly remelting the bracket for use on this? Watching videos online, especially from CNC kitchen on his exploration for Salt Remelting and Plaster Remelting, PLA makes huge gains on temperature resistance, far more than PETG.
It would appear logical that these are the two steps needed to strengthen the bracket
- move my Z Probe up about 2mm, so the Probe always triggers before the nozzle touches
- remelt the bracket for temperature resistance
However, it leaves a BIG question as to how/why the BMG Wind Plastic half cracked. Any thoughts on that one? I can’t crack that one out.
Hi.
Your problem might be related to the motor overheating. In this case, I would recommend actually fine-tuning the VREF so that it runs a bit cooler and does not damage the printed part.
Adding a 5015 fan to the heatsink is not the smartest solution. A 4010 should work well enough if you use a bi-metal heat break.
Thanks for the feedback; I was re-reading the Thingiverse Comment and noticed the small statement around both Temperature Resistant Filament as well as Vref adjustments. You would think that would be prominently in the forefront.
To be honest I don’t want to do Vref adjustments 
Instead, I am going to try to Heat Treat a PLA print of the bracket this weekend
CNC Kitchen’s video shows I’m going to lose on strength whether I go with Plaster or Salt Processing, but it will still be well above the weight of the Extruder Assembly + Force to pull filament…but the ability to gain Temp Resistance to around 170C should eliminate all problems, even if I might have to measure % changes for this particular part
Although somewhat imperfect since NEMA15 references faceplate size, digging through a few data sheets of different NEMA15 steppers shows consistently that max operating temperature is around 80-100C, which should be well below heat treated PLA.
Edit: Also I thought through the failure of the BMG Wind more. I think the BMG Wind cracks likely are a result of the deformation; as the bracket starting sagging outwards on the top, it likely created a stress on the bottom as the extruder was now pressed against the housing…creating cracking. Luckily I have an extra BMG wind to use. It makes sense to me, especially given I’ve printed a duplicate bracket and can really see the differences between the duplicate, and the one that failed thermally.
It has been a while but I’m happy to announce that the problem is solved, though it took a bit more effort.
Heat & Stress was absolutely the problem - the Extruder was heating up around 100C, and my Z on the bed level was too low, causing the nozzle to press into the bed each time I Zeroed all Axes (my Z Offset used to be around +1.5mm). Basically, Heat and the Force caused it to deform to the degree that was observed.
The solution was simpler than I anticipated; print the bracket in PLA, and heat treat at ~105C/235F for one hour, suspended in a packed container of powered salt. The PLA will still crystallize.
Remelting is not required to crystallize the polymer, and TBH, remelting is a huge hassle and is a big mess. Only attempt if you need to fuse layers. I tried it with both Plaster of Paris (an even bigger mess), and powered salt. In the end I kept powered salt - the part didn’t deform at all.
Keep in mind that it takes a while for the part, inside a container of powdered salt, to heat up. With a thermometer embedded inside, it was almost 2 hours just to break 100C; only at that point did the 1 Hour clock begin.